Physical Address
304 North Cardinal St.
Dorchester Center, MA 02124
Physical Address
304 North Cardinal St.
Dorchester Center, MA 02124
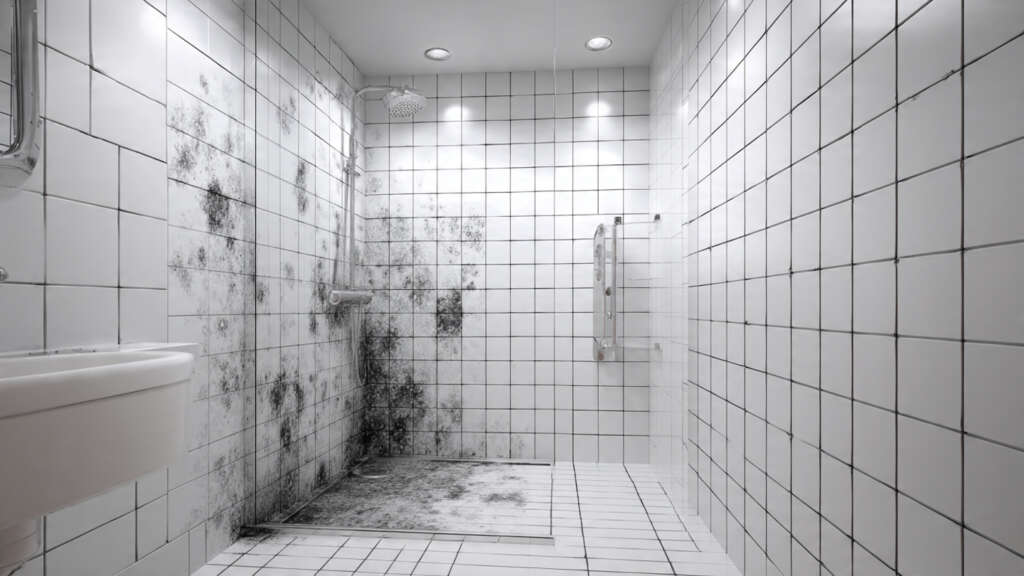
Dark stains along shower grout lines, blackened caulking, or musty odours that persist even after cleaning — these are the classic signs of bathroom mold. It’s one of the most common home maintenance problems, and most bathrooms will experience it at some point given how well showers replicate the warm, humid, poorly-ventilated conditions that mold needs to grow.
The good news is that shower mold is usually surface-level and entirely manageable with the right cleaning approach. This guide covers everything in practical order: what you’re actually dealing with, the correct cleaning method for each surface type, what genuinely works (and what doesn’t), and how to prevent it from coming back.
📋 Important clarification from the CDC: “You do not need to know the type of mold growing in your home. All molds should be treated the same with respect to potential health risks and removal.” The focus should be on fixing the moisture problem and removing the mold — not on identifying the exact species.
When most people find dark patches in their shower, they immediately think “black mold” — often picturing the highly toxic Stachybotrys chartarum featured in alarming news stories. The reality is considerably more reassuring. The dark mold you find in a shower is most commonly one of several far more common species: Cladosporium (olive-green to black, very common on grout and shower curtains), Aspergillus (various colours including dark shades), or Alternaria (dark green or brown, typically found around shower bases and sinks). Choosing the right shower door material can help prevent mold buildup. Here’s what you need to know.
True Stachybotrys chartarum, the genuinely toxic species, requires continuous moisture on cellulose-based materials like wood, drywall, or paper to establish itself. Shower tile, grout, and caulk don’t contain cellulose. This means the mold you’re scrubbing off shower tiles is very unlikely to be the most dangerous variety, even if it looks black. That said, all shower mold should be removed regardless of species. Common bathroom molds still trigger allergic reactions, irritate airways, and degrade your bathroom surfaces over time.
“The bottom line from the EPA: if you see or smell mold, clean it up and fix the moisture source. You don’t need to identify the species first — the removal approach is the same regardless.”
These two terms are often used interchangeably, but they describe meaningfully different problems with different cleaning requirements.
| Feature | Shower Mold | Mildew |
|---|---|---|
| Colour | Dark green, brown, or black | White, grey, or light yellow |
| Texture | Slimy, fuzzy, or deeply stained | Powdery or flat surface only |
| Smell | Strong, persistent musty odour | Mild, earthy less intense |
| Depth | Can penetrate porous surfaces (grout, caulk) | Mild, earthy, less intense |
| Health risk | Allergens can trigger respiratory symptoms in sensitive individuals | Mild irritant generally low risk for most people |
| Cleaning difficulty | Harder may require grout brush, multiple applications, or caulk replacement | Harder may require a grout brush, multiple applications, or caulk replacement |
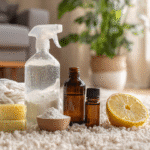
If wiping a damp cloth across the stain removes it completely, it’s likely mildew. If the discolouration persists or has grown into the grout texture itself, it’s mold, and it needs the targeted approach described below. Keep your entire home clean and mold-free with this easy and affordable DIY carpet cleaner recipe.
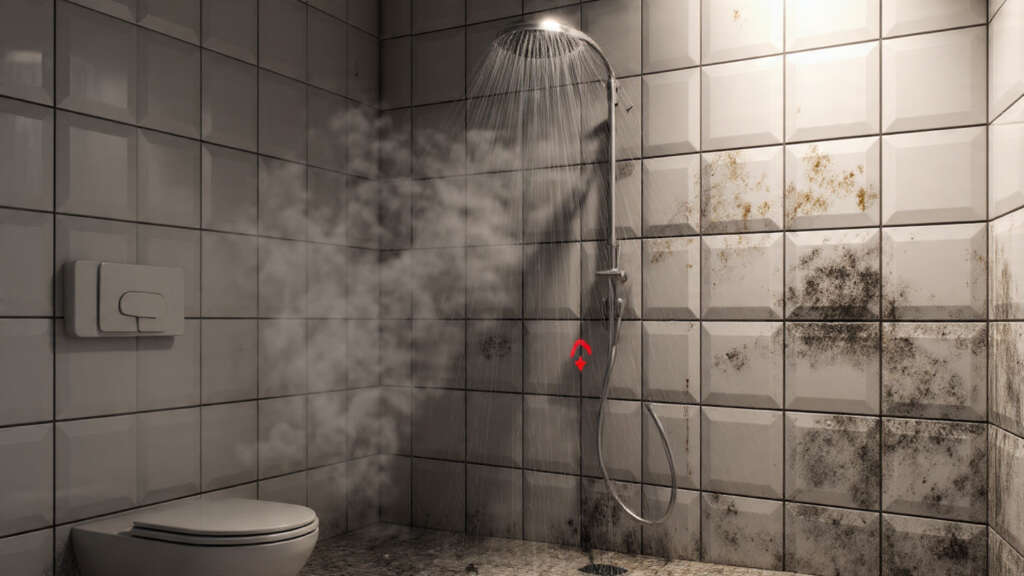
Understanding why mold grows in your specific shower is the most important step because cleaning mold without addressing the underlying cause means it will return within weeks. Every shower mold problem has one root cause: moisture that isn’t drying out fast enough. Everything else is secondary.
The most common cause. When you shower with hot water, steam condenses on walls, tiles, and ceilings. Without adequate ventilation, that moisture sits on surfaces for hours, plenty of time for mold spores (which are always present in air) to establish themselves. A functioning bathroom exhaust fan, run during and for 20–30 minutes after showering, removes the majority of this moisture before mold can take hold. Mold isn’t the only hidden home health risk. Learn these smart DIY tips to reduce radon levels without major renovations.
Grout is porous and naturally absorbs moisture. Over time, it also cracks and gaps, allowing water to penetrate behind tiles. Similarly, shower caulk degrades, becoming brittle, cracking, or pulling away from surfaces, which lets water seep into hidden spaces. Mold in these hidden areas is the reason some shower mold keeps returning despite regular cleaning: you’re treating the visible surface but not the moisture pocket behind it.
A slow leak behind your shower wall, under the shower tray, or around a showerhead fitting creates a continuously damp environment that never fully dries. If mold keeps recurring in a specific spot despite proper ventilation and regular cleaning, inspect for hidden water ingress in that area first.
Leaving wet towels or loofahs in the shower, not squeegeeing walls after showering, leaving the shower curtain bunched up (rather than spread out to dry), and skipping regular cleaning all contribute to faster mold growth. None of these is individually catastrophic, but combined with inadequate ventilation, they create reliably mold-friendly conditions.
It’s worth separating fact from the considerable amount of exaggeration online about shower mold health risks. The accurate picture, drawn from CDC guidance on mold health effects and removal and more reassuring for most people than much of what circulates on cleaning blogs.
According to the EPA, mold exposure can cause nasal stuffiness, throat irritation, coughing, wheezing, burning eyes, and skin rash in some people. People with allergies to mold, asthma, or compromised immune systems may have more significant reactions. For healthy adults with no pre-existing respiratory conditions, occasional exposure to common bathroom mold species typically causes mild or no symptoms.
The CDC is clear that shower mold growing on tile, grout, and caulk in a well-used bathroom is unlikely to be Stachybotrys chartarum, which requires cellulose-rich materials and prolonged uninterrupted moisture. The CDC also states it does not recommend routine mold testing or species identification for home mold problems: “The health effects of mold exposure, according to Cleveland Clinic.”
⚠️ Higher risk groups: People with asthma, mold allergies, chronic lung disease, or significantly compromised immune systems are more vulnerable to health effects from any mold exposure — regardless of species. If household members in these categories are experiencing persistent respiratory symptoms, addressing shower mold should be treated as a priority health concern, not just a cleaning task.
The clearest indicator is symptom pattern: if you or family members experience nasal congestion, coughing, sneezing, or eye irritation that improves noticeably when away from home but worsens after showering or spending time in the bathroom, mold may be a contributing factor. In such cases, thorough mold removal and ventilation improvement should be the first steps before attributing symptoms to other causes.
Different shower surfaces require different approaches. The most common mistake is applying the same solution to all surfaces, which often means using something too harsh for tiles but too mild for grout, or missing heavily contaminated caulking entirely.
.surface-grid{ display:grid; grid-template-columns:repeat(auto-fit, minmax(260px,1fr)); gap:18px; margin:25px 0; font-family: Arial, sans-serif; } .surface-card{ background:#fff; border-radius:14px; padding:18px; box-shadow:0 6px 18px rgba(0,0,0,0.08); transition:all 0.3s ease; border:1px solid #eee; position:relative; overflow:hidden; } .surface-card:hover{ transform:translateY(-6px); box-shadow:0 12px 28px rgba(0,0,0,0.12); } .surface-card::before{ content:””; position:absolute; top:0; left:0; width:100%; height:4px; } /* Color themes */ .surface-card.tiles::before{background:#3b82f6;} .surface-card.grout::before{background:#92400e;} .surface-card.caulk::before{background:#111827;} .surface-card.curtain::before{background:#10b981;} .sc-top{ display:flex; align-items:center; gap:10px; margin-bottom:10px; } .sc-emoji{ font-size:22px; } .sc-name{ font-size:16px; font-weight:700; color:#1f2937; } .sc-body{ font-size:14px; line-height:1.6; color:#555; margin-bottom:12px; } .sc-method{ display:inline-block; font-size:13px; font-weight:600; padding:6px 10px; border-radius:8px; background:#f1f5f9; color:#334155; } /* Slight color tint for each card */ .tiles{background:linear-gradient(135deg,#f0f7ff,#ffffff);} .grout{background:linear-gradient(135deg,#fdf6ec,#ffffff);} .caulk{background:linear-gradient(135deg,#f3f4f6,#ffffff);} .curtain{background:linear-gradient(135deg,#ecfdf5,#ffffff);}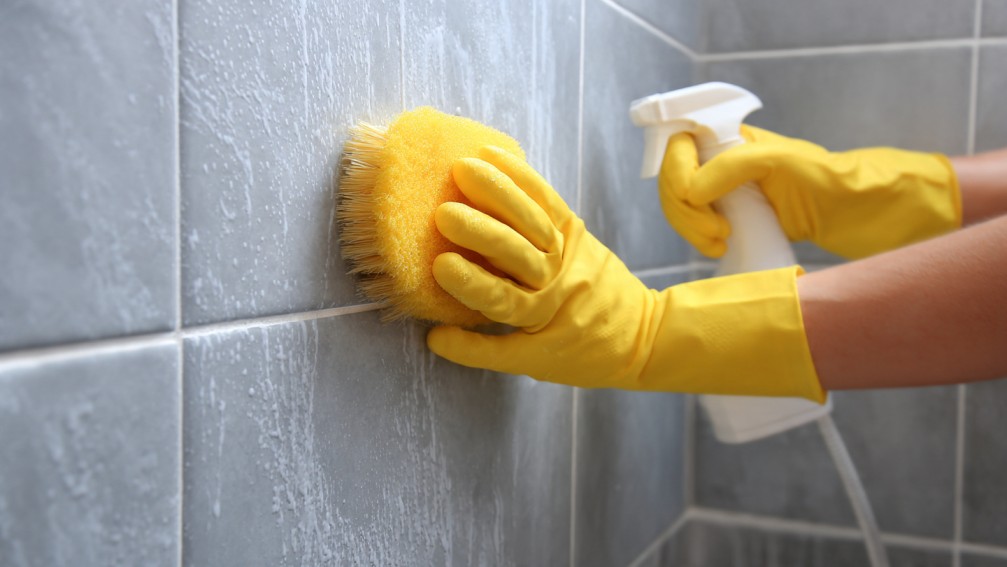
Before starting any cleaning, open windows and turn on the exhaust fan for ventilation. Wear rubber gloves and a face mask, as mold releases spores into the air. If the affected area is larger than 10 square feet (roughly a 3-foot by 3-foot area), consider professional remediation rather than DIY cleaning.
.method-box { border-radius: 14px; overflow: hidden; box-shadow: 0 6px 18px rgba(0,0,0,0.06); margin: 30px 0; background: #fff; transition: all 0.3s ease; } .method-box:hover { transform: translateY(-5px); box-shadow: 0 12px 28px rgba(0,0,0,0.12); } .method-header { display: flex; align-items: center; gap: 12px; padding: 16px 18px; } .method-header h3 { margin: 0; font-size: 18px; } .method-body { display: grid; grid-template-columns: 1fr 1fr; gap: 20px; padding: 20px; } .method-col-title { font-weight: 600; margin-bottom: 10px; font-size: 15px; } .method-ing, .method-steps { padding-left: 18px; font-size: 14px; color: #555; line-height: 1.6; } .method-note { background: #eef6ff; padding: 14px 18px; font-size: 13px; border-top: 1px solid #e3eaf3; line-height: 1.6; } /* Responsive */ @media (max-width: 768px) { .method-body { grid-template-columns: 1fr; } }Cleaning removes existing mold but achieves nothing long-term if the conditions that caused it remain unchanged. These prevention measures address the root causes directly.
.prev-grid { display: grid; grid-template-columns: repeat(auto-fit, minmax(260px, 1fr)); gap: 20px; margin: 30px 0; } .prev-card { background: #ffffff; border-radius: 14px; padding: 18px; box-shadow: 0 6px 18px rgba(0,0,0,0.06); transition: all 0.3s ease; position: relative; border-top: 4px solid #4f46e5; } .prev-card:hover { transform: translateY(-6px); box-shadow: 0 12px 28px rgba(0,0,0,0.12); } .pc-icon { font-size: 22px; display: inline-block; margin-bottom: 10px; } .pc-title { font-size: 16px; font-weight: 600; margin-bottom: 8px; } .pc-body { font-size: 14px; line-height: 1.6; color: #555; } /* Color variations */ .prev-card:nth-child(1) { border-top-color: #2563eb; } .prev-card:nth-child(2) { border-top-color: #0ea5e9; } .prev-card:nth-child(3) { border-top-color: #16a34a; } .prev-card:nth-child(4) { border-top-color: #f59e0b; } .prev-card:nth-child(5) { border-top-color: #06b6d4; } .prev-card:nth-child(6) { border-top-color: #9333ea; }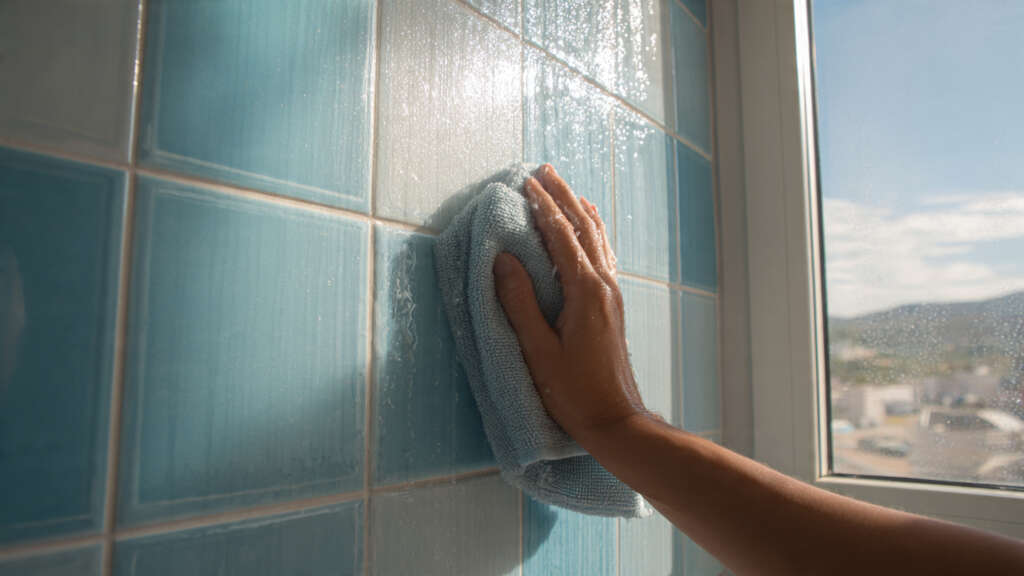
Most shower mold is DIY-manageable. Addressing shower mold is part of a broader pattern of proactive home maintenance. See our guides on other home maintenance repairs worth tackling yourself. These specific circumstances indicate a situation beyond what household cleaning can address:
.trigger-list { list-style: none; padding: 0; margin: 20px 0; } .trigger-item { display: flex; gap: 15px; background: #fff5f5; border-left: 5px solid #e63946; padding: 16px; border-radius: 10px; margin-bottom: 15px; box-shadow: 0 4px 12px rgba(0,0,0,0.05); transition: transform 0.2s ease, box-shadow 0.2s ease; } .trigger-item:hover { transform: translateY(-3px); box-shadow: 0 8px 18px rgba(0,0,0,0.1); } .trigger-icon { font-size: 20px; color: #e63946; flex-shrink: 0; margin-top: 4px; } .trigger-content strong { display: block; font-size: 16px; color: #b00020; margin-bottom: 5px; } .trigger-content p { margin: 0; font-size: 14px; color: #333; line-height: 1.6; }This is the EPA’s guide to mold, moisture, and your home. A patch larger than roughly 3 feet × 3 feet suggests a more extensive problem than surface cleaning can address.
Rapid recurrence after cleaning indicates mold roots in the substrate (grout, backing material, or behind tiles) or an active moisture source feeding regrowth. Professional inspection can locate hidden leaks or moisture pockets.
A lingering musty odour after thorough cleaning usually means mold inside the wall cavity, behind tiles, or under the shower tray — areas that visual inspection and household cleaning cannot reach.
Soft drywall, bubbling paint, or discolouration spreading beyond the shower area onto adjacent walls suggests water is penetrating behind the shower structure — potentially requiring tile removal and structural remediation.
If people in your household — especially those with asthma or mold allergies — experience respiratory symptoms that correlate with bathroom use, professional inspection and air quality testing is appropriate.
Professional mold remediation for a bathroom typically costs $500–$1,500 depending on the extent of the problem. A certified specialist will use moisture meters and thermal cameras to locate hidden sources, apply industrial-grade treatments, and verify successful removal — addressing the cause, not just the visible symptom.
No — and this is one of the most widespread mold misconceptions. The term “toxic black mold” refers specifically to Stachybotrys chartarum, which requires sustained moisture on cellulose-based materials (wood, drywall, paper) to establish. Shower tile, grout, and caulk don’t contain cellulose. The dark mold you find in a shower is most commonly Cladosporium, Aspergillus, or Alternaria — all of which can cause allergic reactions but are considerably less dangerous than Stachybotrys. The CDC’s guidance is to treat all household mold the same way: remove it and fix the moisture source, regardless of species.
Vinegar kills mold effectively on non-porous surfaces like tiles and glass, where it can contact the mold directly. On porous surfaces like grout, its penetration is more limited. Independent testing shows it’s reasonably effective for surface mold, but for deep grout staining, a hydrogen peroxide paste tends to produce better results. An important caveat: some real-world tests have found vinegar underwhelming on old silicone caulk mold — in that case, removing and replacing the caulk is more effective than any cleaning approach.
No — and this is very commonly recommended online despite being chemically counterproductive. Baking soda is a base (alkaline) and vinegar is an acid. When mixed, they react and neutralise each other, producing water and carbon dioxide gas. The fizzing looks impressive but actually means both ingredients have lost most of their cleaning effectiveness. Use them separately: baking soda paste first (rinse), then vinegar spray — or hydrogen peroxide and baking soda paste together, which is a genuinely effective combination for grout mold.
For active mold prevention, a weekly light clean with a vinegar spray on grout and caulk is more effective than less frequent deep cleans. A proper scrub of grout lines every 2–4 weeks, combined with daily post-shower drying (squeegee + ventilation), prevents most mold from establishing. Annual grout sealing and proactive caulk replacement when it shows wear are the highest-impact occasional maintenance tasks.
Recurring mold after cleaning almost always means one of three things: the moisture source hasn’t been addressed (poor ventilation, inadequate post-shower drying, or a hidden leak); mold roots remain in porous grout or caulk despite surface cleaning; or the caulk is compromised and should be replaced rather than cleaned. Surface cleaning removes visible mold but if the underlying humidity or moisture problem persists, new spores (always present in air) will re-establish within days to weeks.
For most healthy adults, occasional exposure to common bathroom mold while showering is unlikely to cause significant health effects. However, regular exposure in a poorly ventilated space with active mold growth increases the cumulative risk of respiratory irritation over time. People with asthma, mold allergies, or compromised immune systems should address shower mold promptly and prioritise ventilation improvement. If you must shower while mold is present, run the exhaust fan throughout and for 30 minutes afterward to minimise airborne spore concentration.
Shower mold is common, manageable, and — despite its alarming appearance — usually not the highly dangerous species that internet headlines suggest. The important things are to remove it promptly, use the right cleaning method for each surface type (hydrogen peroxide paste for grout, caulk replacement rather than cleaning for silicone, and never mixing vinegar with baking soda), and then address the root cause so it doesn’t come back.
For most bathrooms, proper exhaust fan use and a weekly vinegar spray on grout are sufficient to prevent mold from establishing in the first place. Couple that with annual grout sealing and proactive caulk replacement, and persistent shower mold becomes a problem of the past.
For more home cleaning and maintenance guides, explore our DIY & Home Hacks section.