Physical Address
304 North Cardinal St.
Dorchester Center, MA 02124
Physical Address
304 North Cardinal St.
Dorchester Center, MA 02124
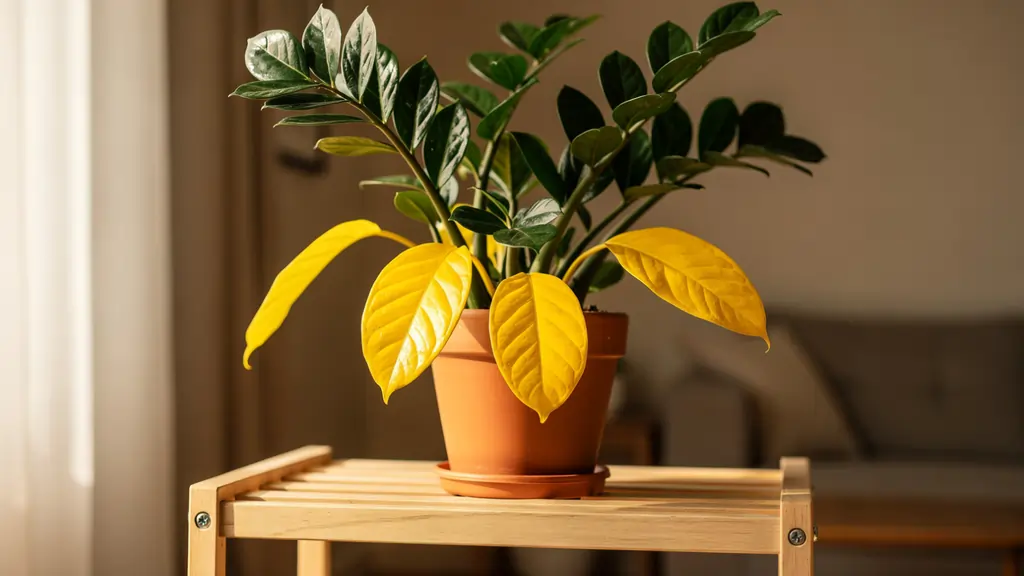
You picked up a ZZ plant because everyone told you it was basically unkillable. So when you walked past it one morning and noticed the leaves going yellow, you probably felt a quiet mix of confusion and guilt. What did you do wrong?
Here is the reassuring truth: yellowing leaves on a ZZ plant — or Zamioculcas zamiifolia, to give it its full name — are one of the most common houseplant problems there is, and in almost every case, the fix is straightforward once you know the cause. The plant is not dying. It is sending you a clear signal, and this guide will help you read it indoor herb garden.
We walk through all 7 causes of ZZ plant yellow leaves below, starting with the most common. Use the quick diagnosis table first to pinpoint which one applies to your plant, then jump straight to that section for the fix. If you are new to ZZ plants and want a full care overview, the University of Maryland Extension has a solid care reference worth bookmarking.
Before we dig into each cause, use this reference table to match what you are actually seeing to the most likely culprit. It takes 30 seconds and will save you a lot of guessing.
| What you are seeing right now | Most likely cause — jump to section |
| Yellow leaves + soggy soil + soft or mushy stems | Cause #1 — Overwatering / Root Rot |
| Yellow leaves + bone-dry soil + crispy edges | Cause #2 — Underwatering |
| Yellow + scorched brown patches on the same leaf | Cause #3 — Too Much Direct Sunlight |
| Yellow spotting + fine webbing on leaf undersides | Cause #4 — Spider Mites or Pests |
| Yellow only on the oldest, lowest leaves — new growth fine | Cause #5 — Natural Leaf Ageing |
| Yellowing started at the tips and edges, not the base | Cause #6 — Over-Fertilising |
| Yellowing appeared after repotting, moving, or a house move | Cause #7 — Transplant / Location Stress |
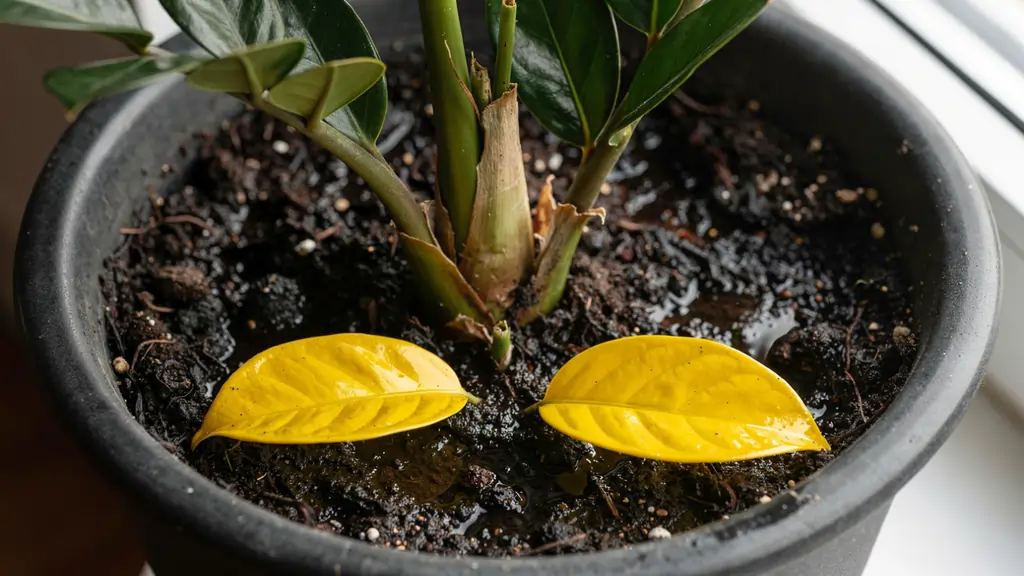
This is the one. Of all the reasons a ZZ plant turns yellow, overwatering is responsible the majority of the time — and it is almost always the first thing worth checking.
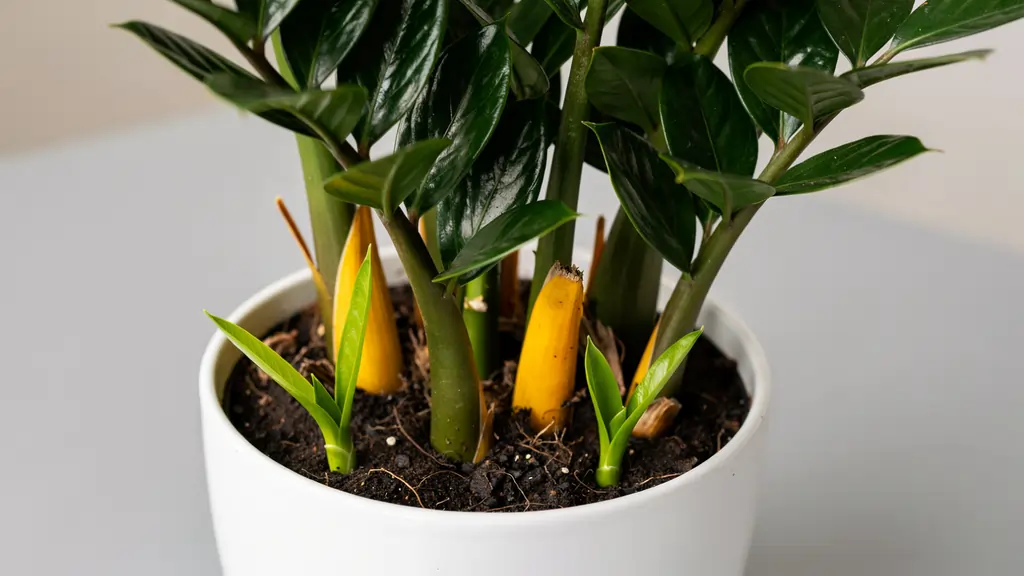
Here is why it happens so easily. ZZ plants are native to the rocky, sandy soils of East Africa, where the climate has long dry seasons and infrequent rainfall. To survive those conditions, the plant evolved underground rhizomes — swollen, potato-like root structures that store water for months at a time. They are literally built for drought.
When you water a ZZ plant on the same schedule as your other houseplants, that stored water has nowhere to go. The roots sit in permanently damp soil, oxygen is cut off, and root rot sets in. The plant responds by turning its leaves yellow — its only way of signalling that something is wrong underground.
The yellowing tends to start at the base of the stems, not the leaf tips. Gently press the stems just above the soil line — if they feel soft or slightly mushy, that is a strong indicator of rot. In advanced cases, the soil will carry a faint sour smell. If you tip the plant from the pot, the roots may be dark brown or black rather than their healthy pale tan colour.
Forget watering schedules. The single most reliable method for knowing when to water a ZZ plant is to push your finger about two inches into the soil. If you feel any moisture at all — not just surface dryness, but actual dampness two inches down — put the watering can away and check again in a week.
In practice, that usually means watering every two to three weeks in summer and every four to six weeks in winter when growth slows. But the soil is always the final word.
If the soil is wet right now:
Stop watering immediately. Move the pot to a spot with bright indirect light to help the soil dry out faster. Do not water again until two full inches of soil are completely dry.
If you suspect root rot:
Gently tip the plant from its pot. Cut away any roots that are black, mushy, or smell sour. Let the healthy roots air dry for 30 minutes. Repot in fresh, dry potting mix — one part standard potting compost to one part perlite works well for drainage. Do not water for at least 10 days.
Always use a pot with drainage holes.
A ZZ plant sitting in a decorative pot without drainage holes will develop root rot regardless of how carefully you water, because there is nowhere for excess moisture to escape.
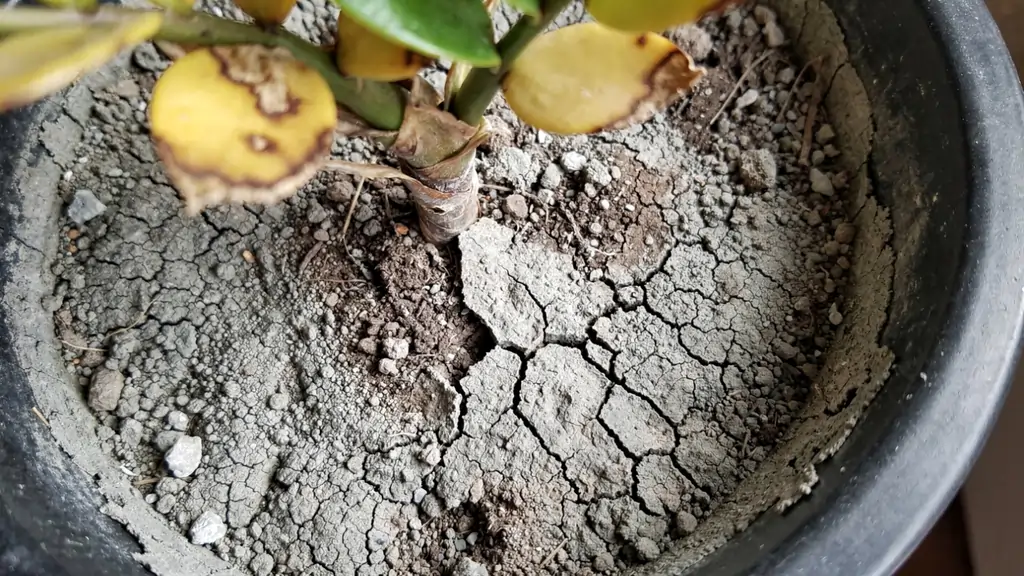
This surprises people, because the ZZ plant’s reputation for tolerating neglect is so well-earned. But there is a limit. If the plant has not been properly watered in several months, or if you have been misting the leaves or only dampening the surface without soaking the root ball, underwatering can cause yellowing just as effectively as too much water.
The key is learning to tell the difference.
Give the plant a proper, deep watering — not just a surface splash. The most effective method when soil has dried out severely is bottom watering: set the pot in a tray or basin of water and leave it for 20 to 30 minutes. This lets the root ball absorb moisture from below rather than having it run straight through bone-dry soil.
After this initial recovery watering, go back to the finger test every week and water only when two inches down is dry.
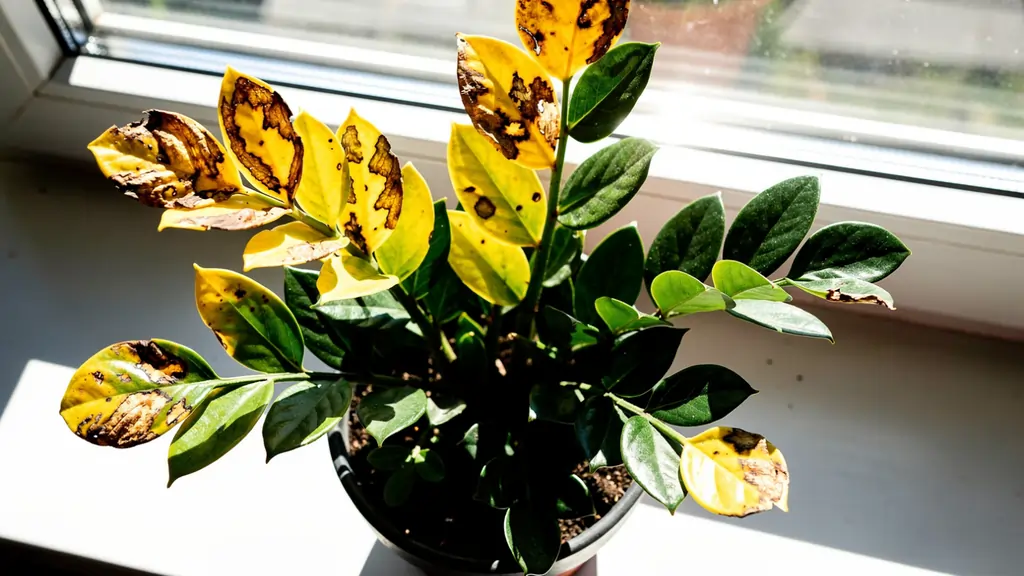
ZZ plants evolved in the dappled shade of the East African forest floor, growing beneath a canopy that filtered out the harshest light. That is why they thrive in low-light rooms and dim corners — and also why direct sunlight can do real damage.
If your ZZ plant is sitting on a sunny windowsill, particularly one that receives intense afternoon sun from the south or west-facing windowsills, the leaves will begin to scorch. It shows up first as yellowing, then progresses to brown, crispy patches on the parts of the leaf that catch the most direct light.
Move the plant two to three feet back from the window, or hang a sheer curtain to filter the light. The scorched and yellowed leaves will not recover — once chlorophyll breaks down it cannot be restored — but once you correct the light, all new growth will come in healthy and green.
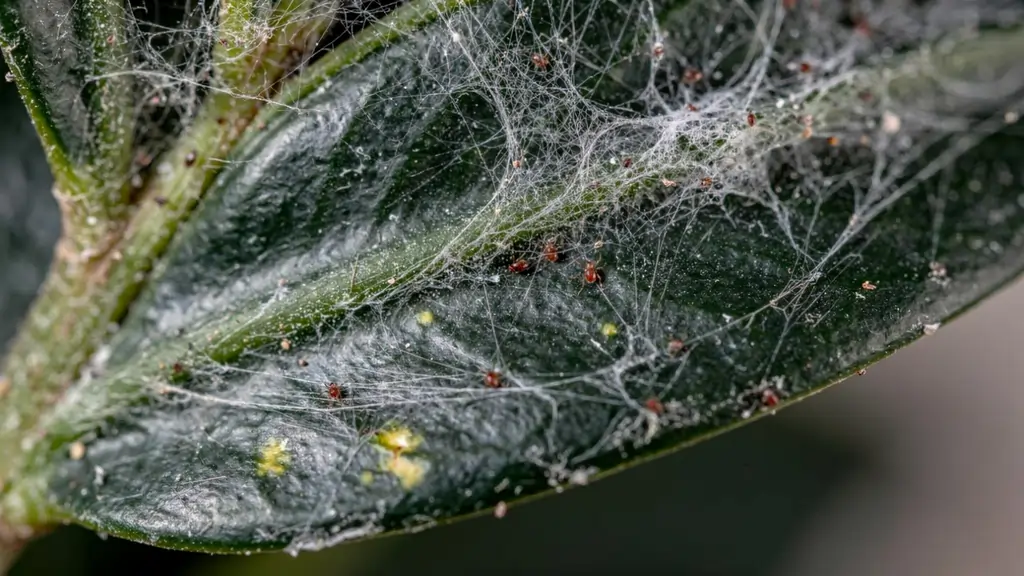
A ZZ plant that is already stressed from overwatering or poor light becomes vulnerable to sap-sucking insects. These pests are small, skilled at hiding, and will spread from one plant to every houseplant in your home if left untreated.
The three most common culprits on ZZ plants are spider mites, mealybugs, and scale insects. Each one leaves slightly different evidence, and knowing what to look for saves time.
Step 1 — Isolate the plant.
Move it away from all other houseplants immediately to prevent the pests from spreading.
Step 2 — Wipe every leaf.
Use a damp cloth to wipe down every leaf — top and bottom. This physical removal step matters more than most people realise.
Step 3 — Spray with neem oil or insecticidal soap.
Coat the undersides of every leaf thoroughly. Repeat every five to seven days for at least three weeks, as pest eggs hatch in cycles and a single treatment will not catch them all.
Step 4 — Monitor for re-infestation.
Check new growth weekly for two to three months. Pests often return from nearby plants.
This is the cause that generates the most unnecessary panic — because it is not a problem at all. ZZ plants naturally cycle out their oldest leaves as they grow. As new stems emerge from the base of the plant, the oldest, lowest leaves on mature stems quietly turn yellow and fall away. This is completely normal houseplant biology.
If this describes what you are looking at, there is nothing to do except remove the yellow leaf. Cut it off cleanly at the base of the stem with clean scissors. No treatment, no repotting, no change to your care routine. The plant is simply growing.
ZZ plants are slow growers that need very little feeding. Their underground rhizomes store nutrients as well as water, which means they can go a surprisingly long time without supplemental fertiliser. Feed them too often — or with a concentrated solution — and excess mineral salts build up in the soil and begin to burn the roots from within.
The result is yellowing that starts at the tips and edges of the leaves rather than the base — a subtle but telling difference. You may also notice a white, crusty layer forming on the surface of the soil, which is the mineral salt deposit made visible. The yellowing often begins a week or two after fertilising, which can make the connection easy to miss.
Flush the soil with plain, room-temperature water. Pour enough through the pot that it runs freely from the drainage holes for several continuous minutes — this washes the excess mineral salts out. Let the pot drain completely, then leave it alone for at least three to four months before considering another feed. The Penn State Extension has solid guidance on fertilising houseplants correctly if you want to go deeper on this.
Going forward: a balanced liquid fertiliser diluted to half the recommended strength, applied once in spring and once in early summer, is everything a ZZ plant needs in a full year. Nothing more.
ZZ plants are creatures of routine. Repotting them, moving them to a new room, bringing them home from a garden centre, or exposing them to sudden temperature changes from an air conditioning vent or a cold window draught can all trigger stress — and stress shows up as yellow leaves.
The reassuring thing about stress yellowing is that it is temporary. Once the plant settles into its new environment and the root system has time to adjust, healthy green growth resumes on its own. Your job in this case is simply to do nothing and let the plant find its feet.
The short answer: no.
Once a ZZ plant leaf turns yellow, the chlorophyll in that leaf has broken down and cannot be restored. The leaf will not return to green no matter what you do to it. This is not something to keep trying to fix — accept it, remove the leaf, and focus on preventing new yellowing by addressing the underlying cause.
Should you cut off yellow ZZ plant leaves?
Yes — once a leaf is more than 50 percent yellow, cut it off at the base of the stem using clean, sterilised scissors. Leaving it attached serves no purpose: the plant will keep directing small amounts of energy toward a leaf it cannot save. Removing it keeps the plant tidy and lets it focus entirely on healthy new growth.
The good news:
Once you have identified and fixed the underlying cause, new leaves will grow in completely healthy and green. Most ZZ plants bounce back well within four to eight weeks of the problem being corrected.
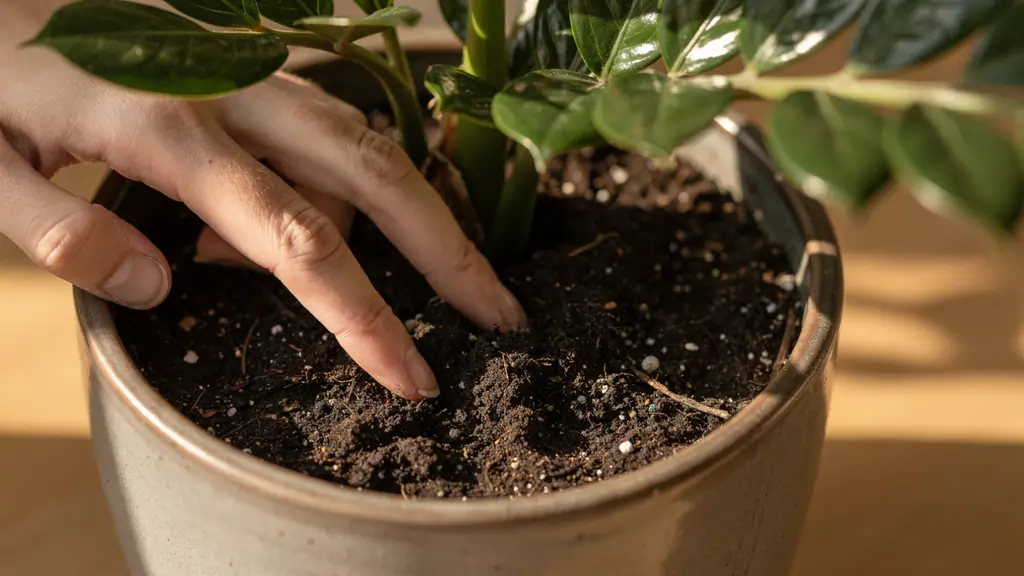
Photorealistic close-up of a person’s hands gently pushing a finger about two inches into dark potting soil inside a ZZ plant pot. Glossy green ZZ plant leaves are visible in the upper portion of the frame. Warm natural indoor lighting. Clean hands, natural skin tone. Focus on the finger in the soil.
STEP 1 — Check the soil
Push your finger two inches into the soil. Wet or damp = likely overwatering. Bone dry and pulling away from edges = underwatering.
STEP 2 — Check the roots (if soil is wet)
Gently tip the plant from its pot. Healthy roots are pale tan. Root rot looks black or dark brown and feels mushy. Cut off all rotted roots and repot in dry, well-draining mix.
STEP 3 — Check the light
Is the plant sitting in direct sun? Move it two to three feet back from the window or add a sheer curtain between the plant and the glass.
STEP 4 — Check the undersides of the leaves
Fine webbing = spider mites. White fluffy clusters = mealybugs. Treat with neem oil spray and isolate the plant from your other houseplants immediately.
STEP 5 — Think about recent changes
Did you recently repot, move, or fertilise? If yes, stress is the most likely cause. Give the plant four to six weeks of complete stability and minimal intervention.
STEP 6 — Remove yellow leaves
Cut off any leaf that is more than 50 percent yellow using clean scissors. No need to treat the cut — ZZ plants heal quickly on their own.
Water every two to three weeks in summer, and every four to six weeks in winter. The soil is always the final guide — push your finger two inches in and only water when it is completely dry at that depth. A fixed schedule is a starting point, not a rule.
Yellowing or pale green leaves, stems that feel soft or mushy close to the soil, and soil that stays wet for longer than two weeks. In advanced cases you may notice a faint sour smell from the soil, which indicates root rot has already set in.
Yes. Once a leaf is more than 50 percent yellow it will not recover. Cut it off at the base of the stem with clean scissors to redirect the plant’s energy to healthy growth.
Transplant shock — a normal, temporary response to repotting. The root system takes a few weeks to re-establish. Hold off watering for seven to ten days after repotting, place in bright indirect light, and leave the plant completely undisturbed for four to six weeks before drawing conclusions.
Yes, if caught early. Remove the plant from its pot, cut away all black and mushy roots, let the remaining roots air dry for 30 minutes, then repot in a fresh dry mix of potting compost and perlite. Do not water for 10 days. New healthy growth is a sign the recovery is working.
No. ZZ plants are among the most light-tolerant houseplants available. They stay green and healthy in low-light rooms, though growth slows. What they cannot handle is prolonged direct sunlight, which scorches rather than feeds them.
ZZ plants are genuinely resilient. The yellowing you are looking at right now almost certainly has a single, fixable cause — and in the majority of cases, it is nothing more than a watering adjustment. Work through the rescue checklist above, make one change at a time, and give your plant a few weeks to respond before changing anything else.
The golden rule with ZZ plants is this: when in doubt, do less. Less water, less fertiliser, less fussing. These plants evolved to thrive on a certain amount of neglect, and the most common mistake owners make is trying to help too much.
If you found this useful and want to keep building your indoor garden, our guide on how to propagate pothos in water is a great next read — another low-maintenance plant that rewards patience with surprisingly satisfying results.